Step 1: Setting up MEmu Emulator
MEmu is a brand of emulator that is considered more consistent than bluestacks. Though similar in performance, it seems to be less error prone among many users.
- Download and install MEmu here: https://www.memuplay.com/
- When creating a new instance, make sure it is on Android Version 7.1 Recommended Version!
- Install Evony. Link either your main or alt account and make sure you can load in!
- Your game MUST be in English. You can change this in the Evony Game Settings.
Step 2: Deleting ADB from MEmu Folder
To prevent conflicts with our own version of ADB, let's delete the one from MEmu. Sometimes Windows will get confused on which to use due to path variables (mine or MEmus).
- Locate where you downloaded MEmu. You can do this by searching “MEmu” on your pc right click “Open file location”
- You will most likely see a shortcut. Right click on that and select “Open File Location”
- Look for adb. Delete it.
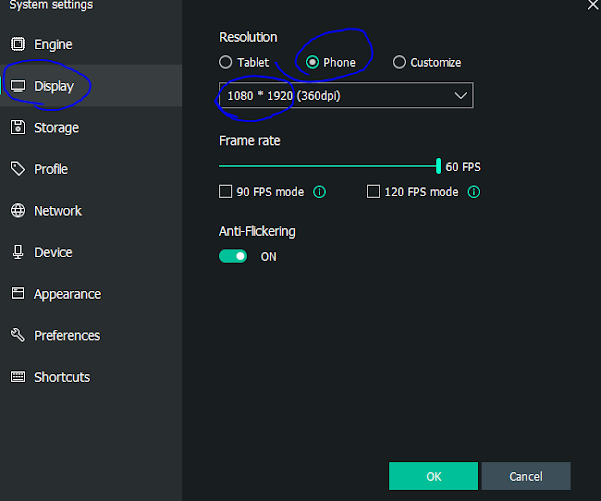
Step 3: Set Display Resolution of MEmu
You must set this resolution. Please do as follows.
- Open up MEmu settings and go to the Display Tab.
- Under resolution, set it to Portrait.
- Set the resolution to 1080 * 1920
- Click Ok. Restart if asked.
Step 4: Android Debug Bridge (ADB) - Finding Port Numbers
MEmu is different from Bluestacks in that it has ADB enabled automatically for you. However, it doesn’t tell you the port numbers. You have to sometimes find them yourself. However, it is pretty easy to find the pattern! You need these ports to connect with ESB.
A. MEmu Port Pattern Explanation:
MEmu follows a pattern when setting up port numbers. You must understand this SIMPLE pattern.
The first MEmu emulator you open will have its own port and it won’t change, just like in bluestacks.
The first port starts at: 21503
Every port after increases the value by 10.
So for four instances, the port values would be:
21503
21513
21523
21533
And so on…
B. Take advantage of naming in MEmu Multi Instance Manager
- Rename each instance to its correct port value so you can remember which instance belongs to which port. Also, please open one at a time, every new memu instance that hasn’t been opened before will have its own port number. So to ensure order of the pattern explained above, just open each for the first time in order!
C. Verifying those ports exist (Optional, in case you can’t find the specific port number)
We want to check that the ports exist. Open up all your emulator instances first. After that, search for “Powershell” on your Windows PC.
- In powershell, paste this command:
- get-nettcpconnection | select local*,remote*,state,@{Name="Process";Expression={(Get-Process -Id $_.OwningProcess).ProcessName}} | Sort-Object LocalPort | Where-Object {($_.Process -like "*MEmu*" -and $_.LocalPort -lt 26000 -and $_.RemoteAddress -like "*0.0.0.0*")}
- You will see a result like below. Keep in mind, it MUST follow the pattern! The first port starts at 21503. Notice how you see 21501, that doesn’t follow the pattern, that isn’t correct. You can see the correct port below at 21503. So that port is open and ready to connect with ESB!
Step 5: Setting up performance on your Emulator
Emulators take up power on your machine. Imagine if your phone was on your computer. It will require some of your own computer’s resources. This is why you need a computer with modern hardware with decent specifications.
- Under MEmu settings, go to the Engine tab.
- Click Customize.
- Set CPU to 1
- Evony doesn’t need more than 1 to run.
- Under RAM, enter 2048.
- You don’t need more than 2GB, believe me.
- Click Ok to save. Restart if asked.
Step 6: Opening and Logging into the Bot (ESB-TKR)
The moment you’ve been waiting for.
- Continue the guide: Part 1: How to Prepare to Install ESB-TKR


Cảm ơn bạn đã đọc bài viết!
- Bạn có gợi ý hoặc bình luận xin chia sẻ bên dưới.
- Hãy viết tiếng Việt có dấu nếu có thể!
Rất cám ơn và mình sẽ trả lời ngay khi đọc được phản hồi của bạn !